“I switched to Crown Down two years ago and haven't replaced a single drill. My implant site prep is noticeably faster and I have much better tactile feedback through the bone.”

Dr. Henri Diederich
Luxembourg
Solid tungsten carbide cortical drills, matched per implant diameter, used first to clear the crestal plate before the trabecular pass begins.
On this page
Drill #1 of the 2-drill protocol
A cortical drill is the crestal bone drill that prepares the dense outer layer of bone before a dental implant is placed. Cortical drills are often called countersinks, but the terminology is borrowed from woodworking. In wood and metal, a countersink creates space for the wide head of a flat-head screw so the screw sits flush. Dental implants are not flat-head screws. They don’t require a wide head to be sunk into the bone, which is why the Crown Down cortical drill is positioned as an implant countersink alternative, not a countersink.
In traditional implant protocols, the cortical drill is used mainly in dense bone, almost always as the final step in the drilling sequence. Its job is to relieve excessive compression in the crestal cortical bone after the rest of the osteotomy is already prepared.
The Crown Down kit treats this dense bone drill as drill #1. The cortical bone is the hardest, densest, and most resistant zone of the osteotomy. Clear it first and the trabecular pass runs into a softer, lower-friction environment, with clean tactile feedback at the cortical-to-trabecular transition.
Traditional protocol
Cortical drill = last
Used as a countersink at the end to relieve compression.
Crown Down protocol
Cortical drill = first
Drill #1, matched to the implant diameter.
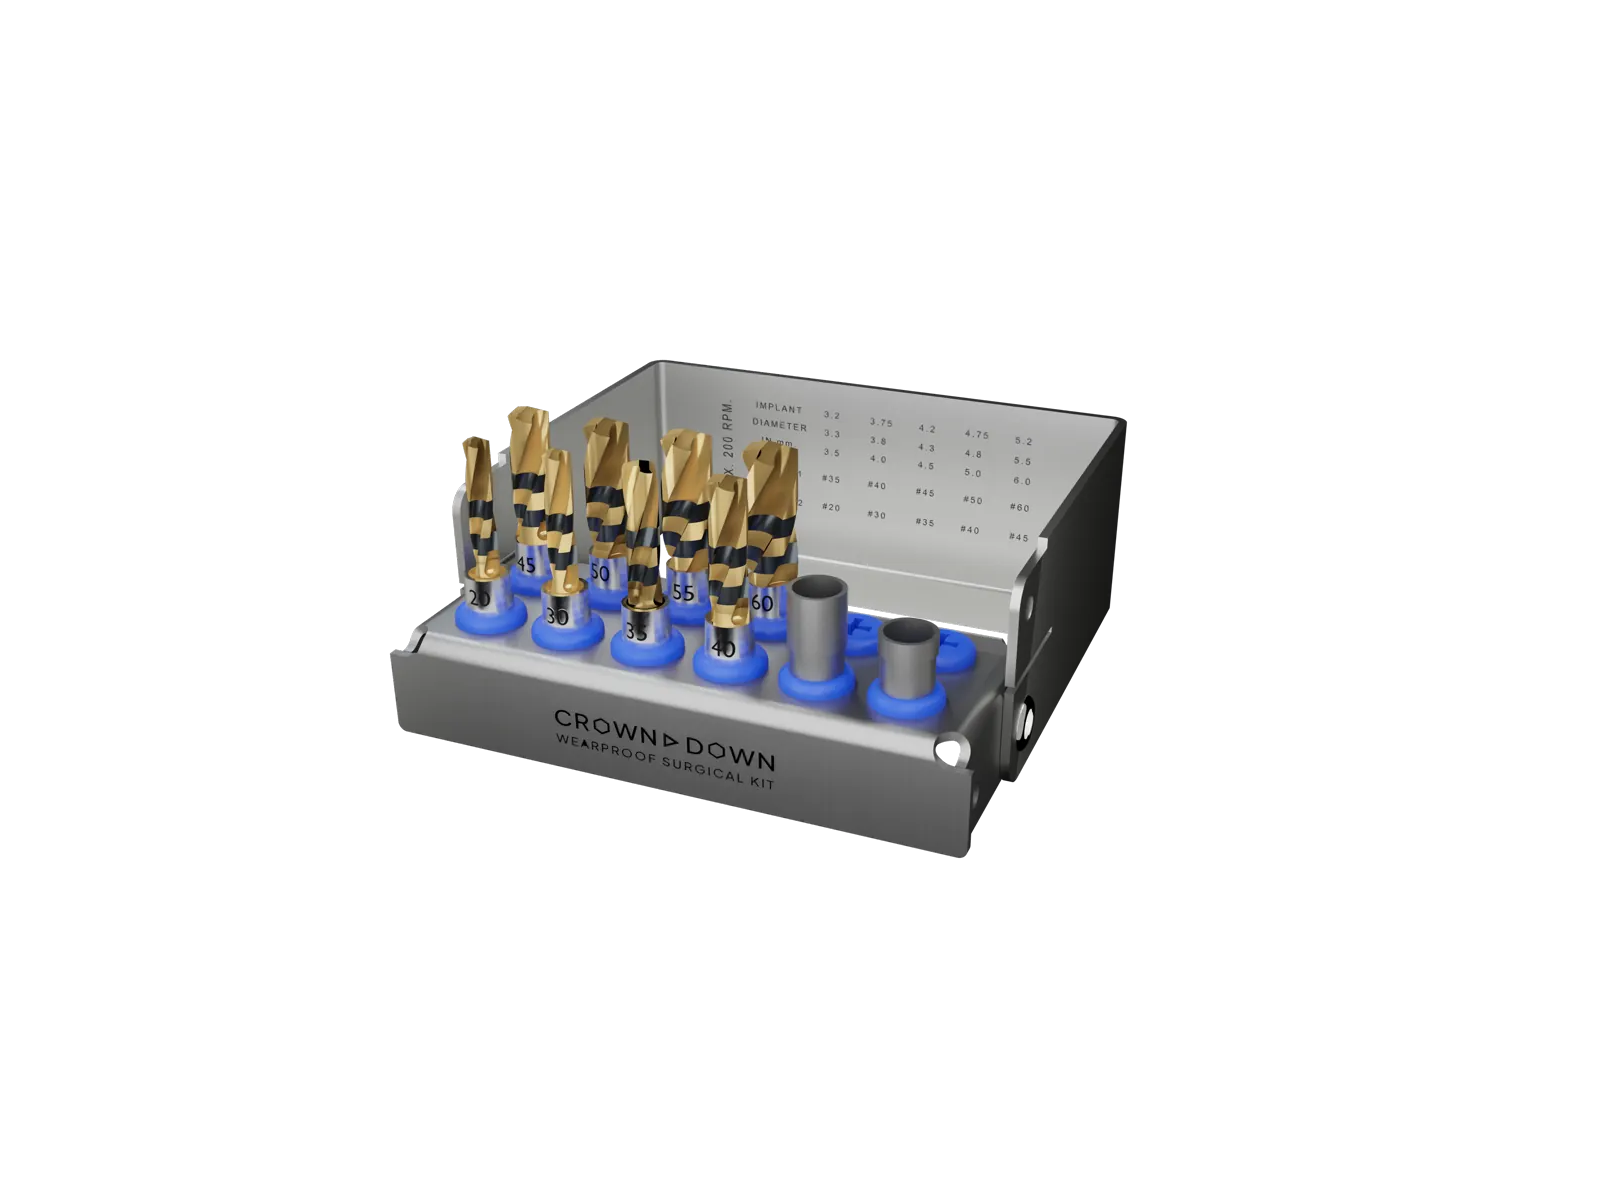
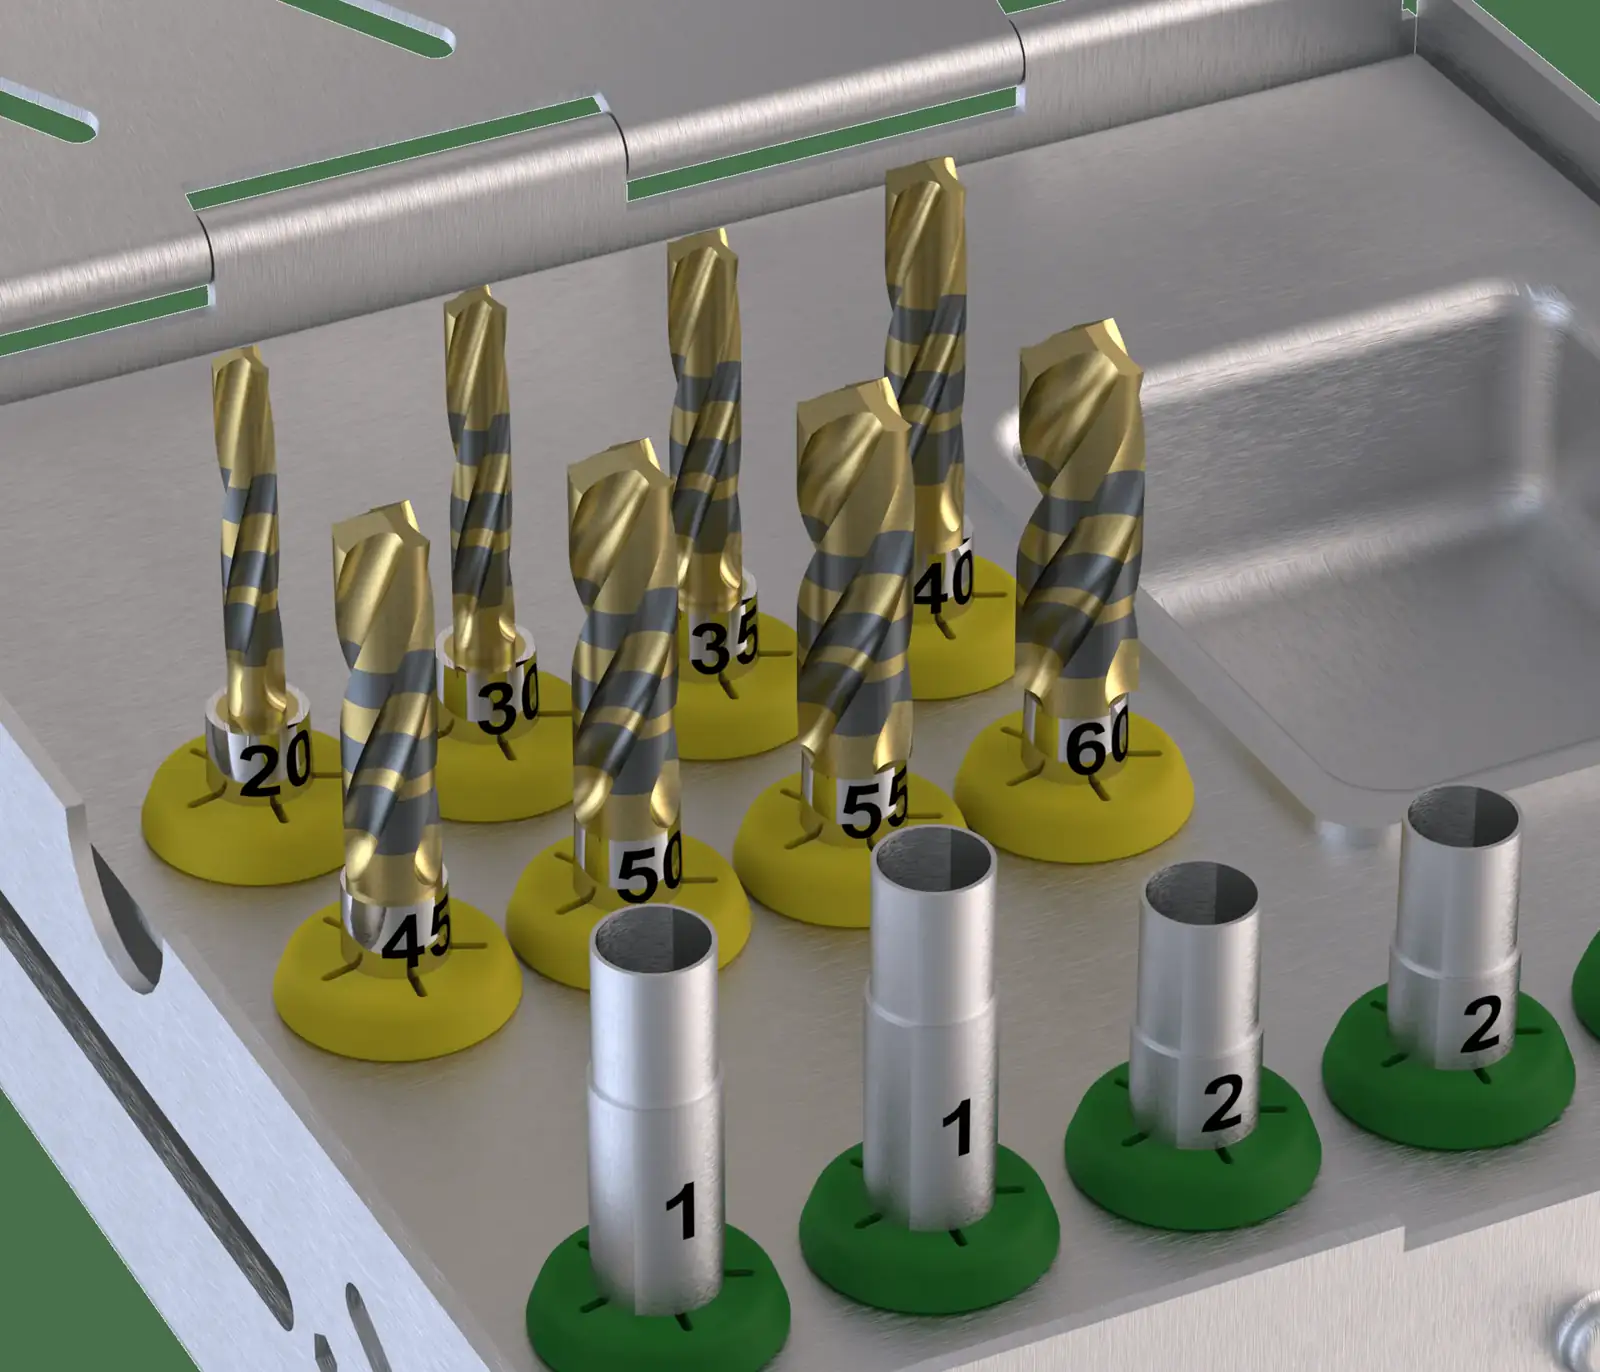
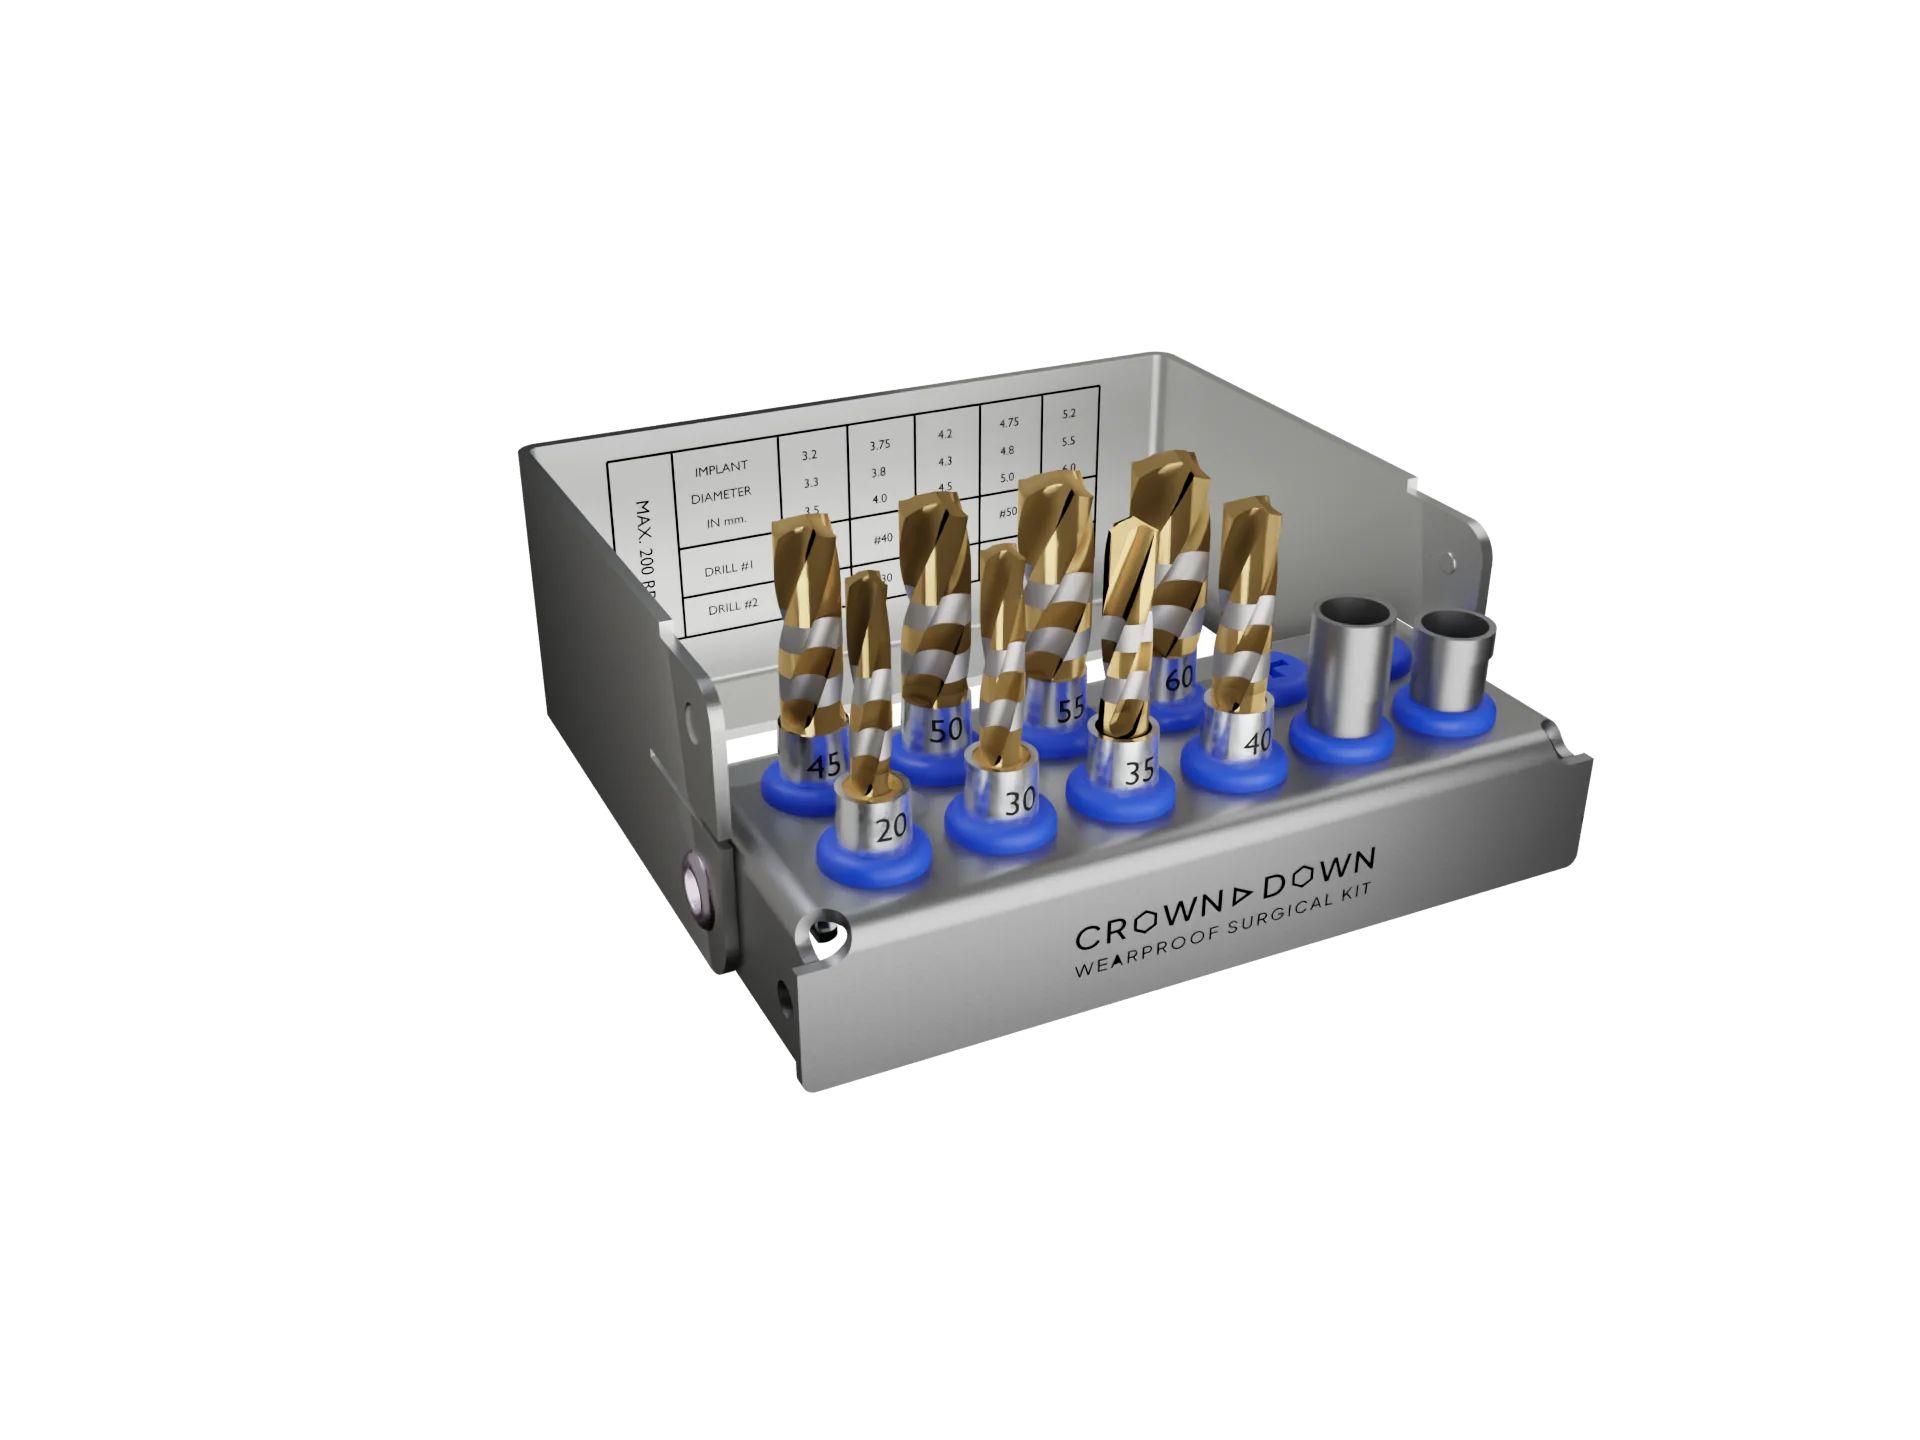
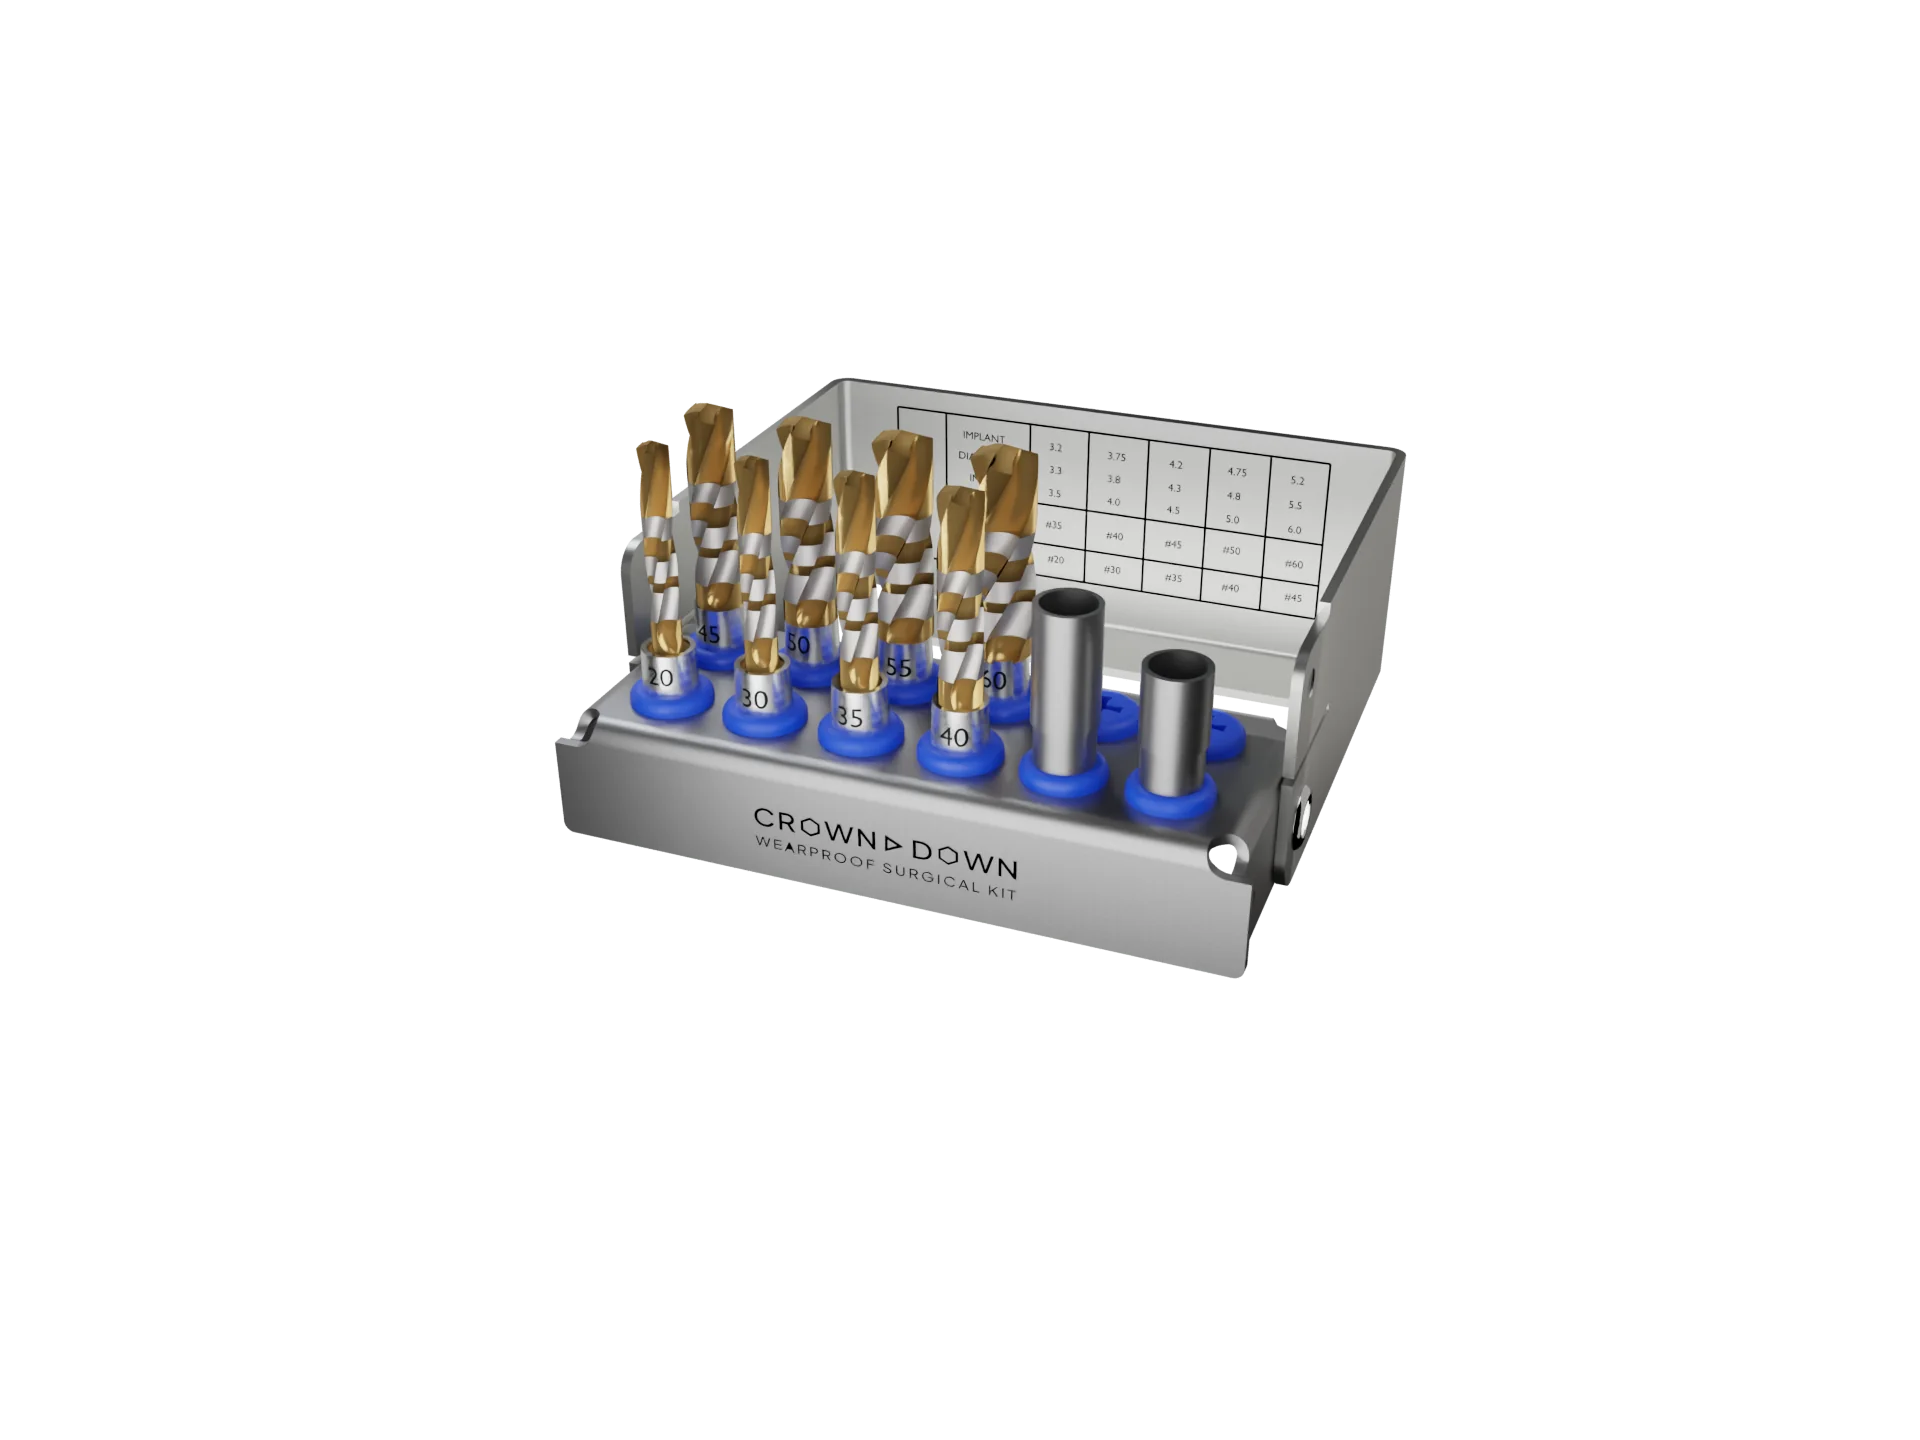
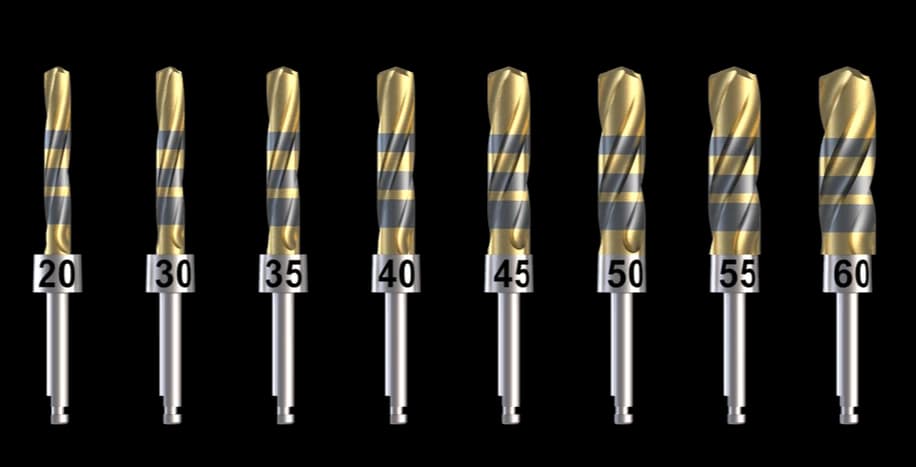
The Crown Down surgical kit: matched cortical (drill #1) and trabecular (drill #2) drills for every implant diameter from 3.3 to 6.0 mm.
Five reasons Crown Down challenges conventional steel drill sequences.
A material engineered to maintain a sharp cutting edge through normal clinical use.
Carbide vs. steelTwo drills per site instead of four to eight, reducing drill changes and chairside complexity.
How it worksUp to 6× less heat in internal thermal testing under controlled conditions.
The heat scienceDesigned to eliminate routine drill replacement under normal clinical use.
Why steel dullsBuilt for guided and freehand implant workflows, with compatibility across major implant systems.
CompatibilityThe 2-drill chart
The Crown Down drilling chart always pairs two drills per implant diameter. Drill #1 is the cortical drill, used first to clear the crestal cortical plate. Drill #2 is the trabecular drill, used second to prepare the cancellous bone underneath.
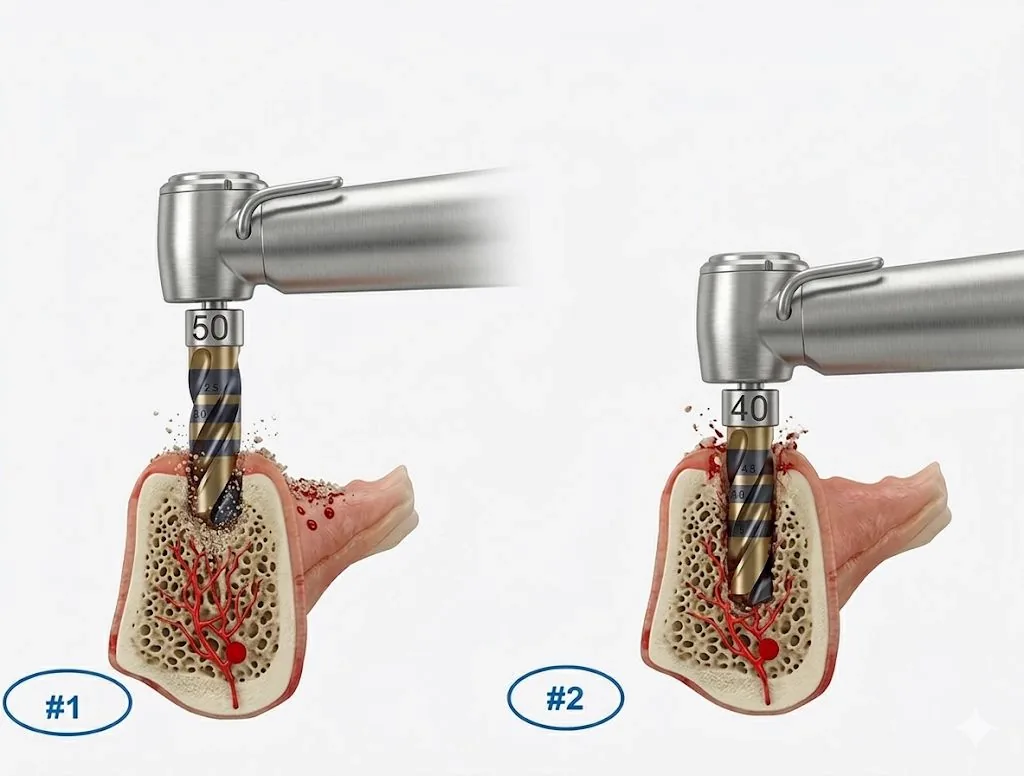
Drill #1 (cortical) clears the crestal plate. Drill #2 (trabecular) prepares the cancellous bone with the blood supply intact.
Matched to the implant
Every implant diameter has its own cortical drill. Cortical preparation is sized to the implant being placed, not to a single general-purpose countersink.
Tactile transition
Cortical bone thickness varies from patient to patient and site to site. When drill #1 punches through the cortex, the clinician feels the transition into softer trabecular bone, instead of relying on a fixed depth assumption.
Predictable insertion
Cortical resistance is removed before the implant body engages. Insertion torque becomes a function of the trabecular pass alone, which is the part of the osteotomy the clinician can actually titrate.
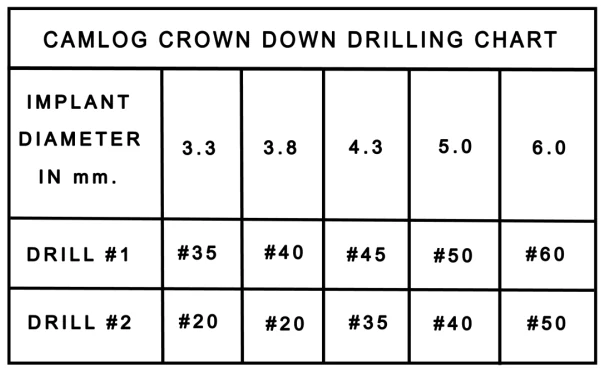
Crown Down drilling chart for Camlog implants. Full system-specific charts live on the compatibility page.
Inside the kit
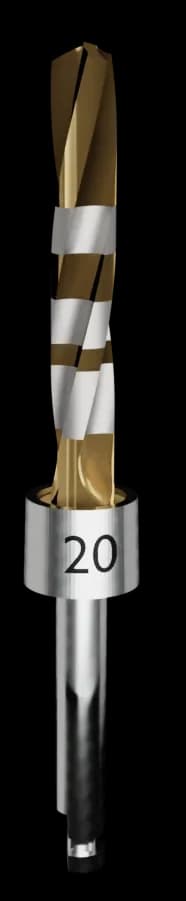
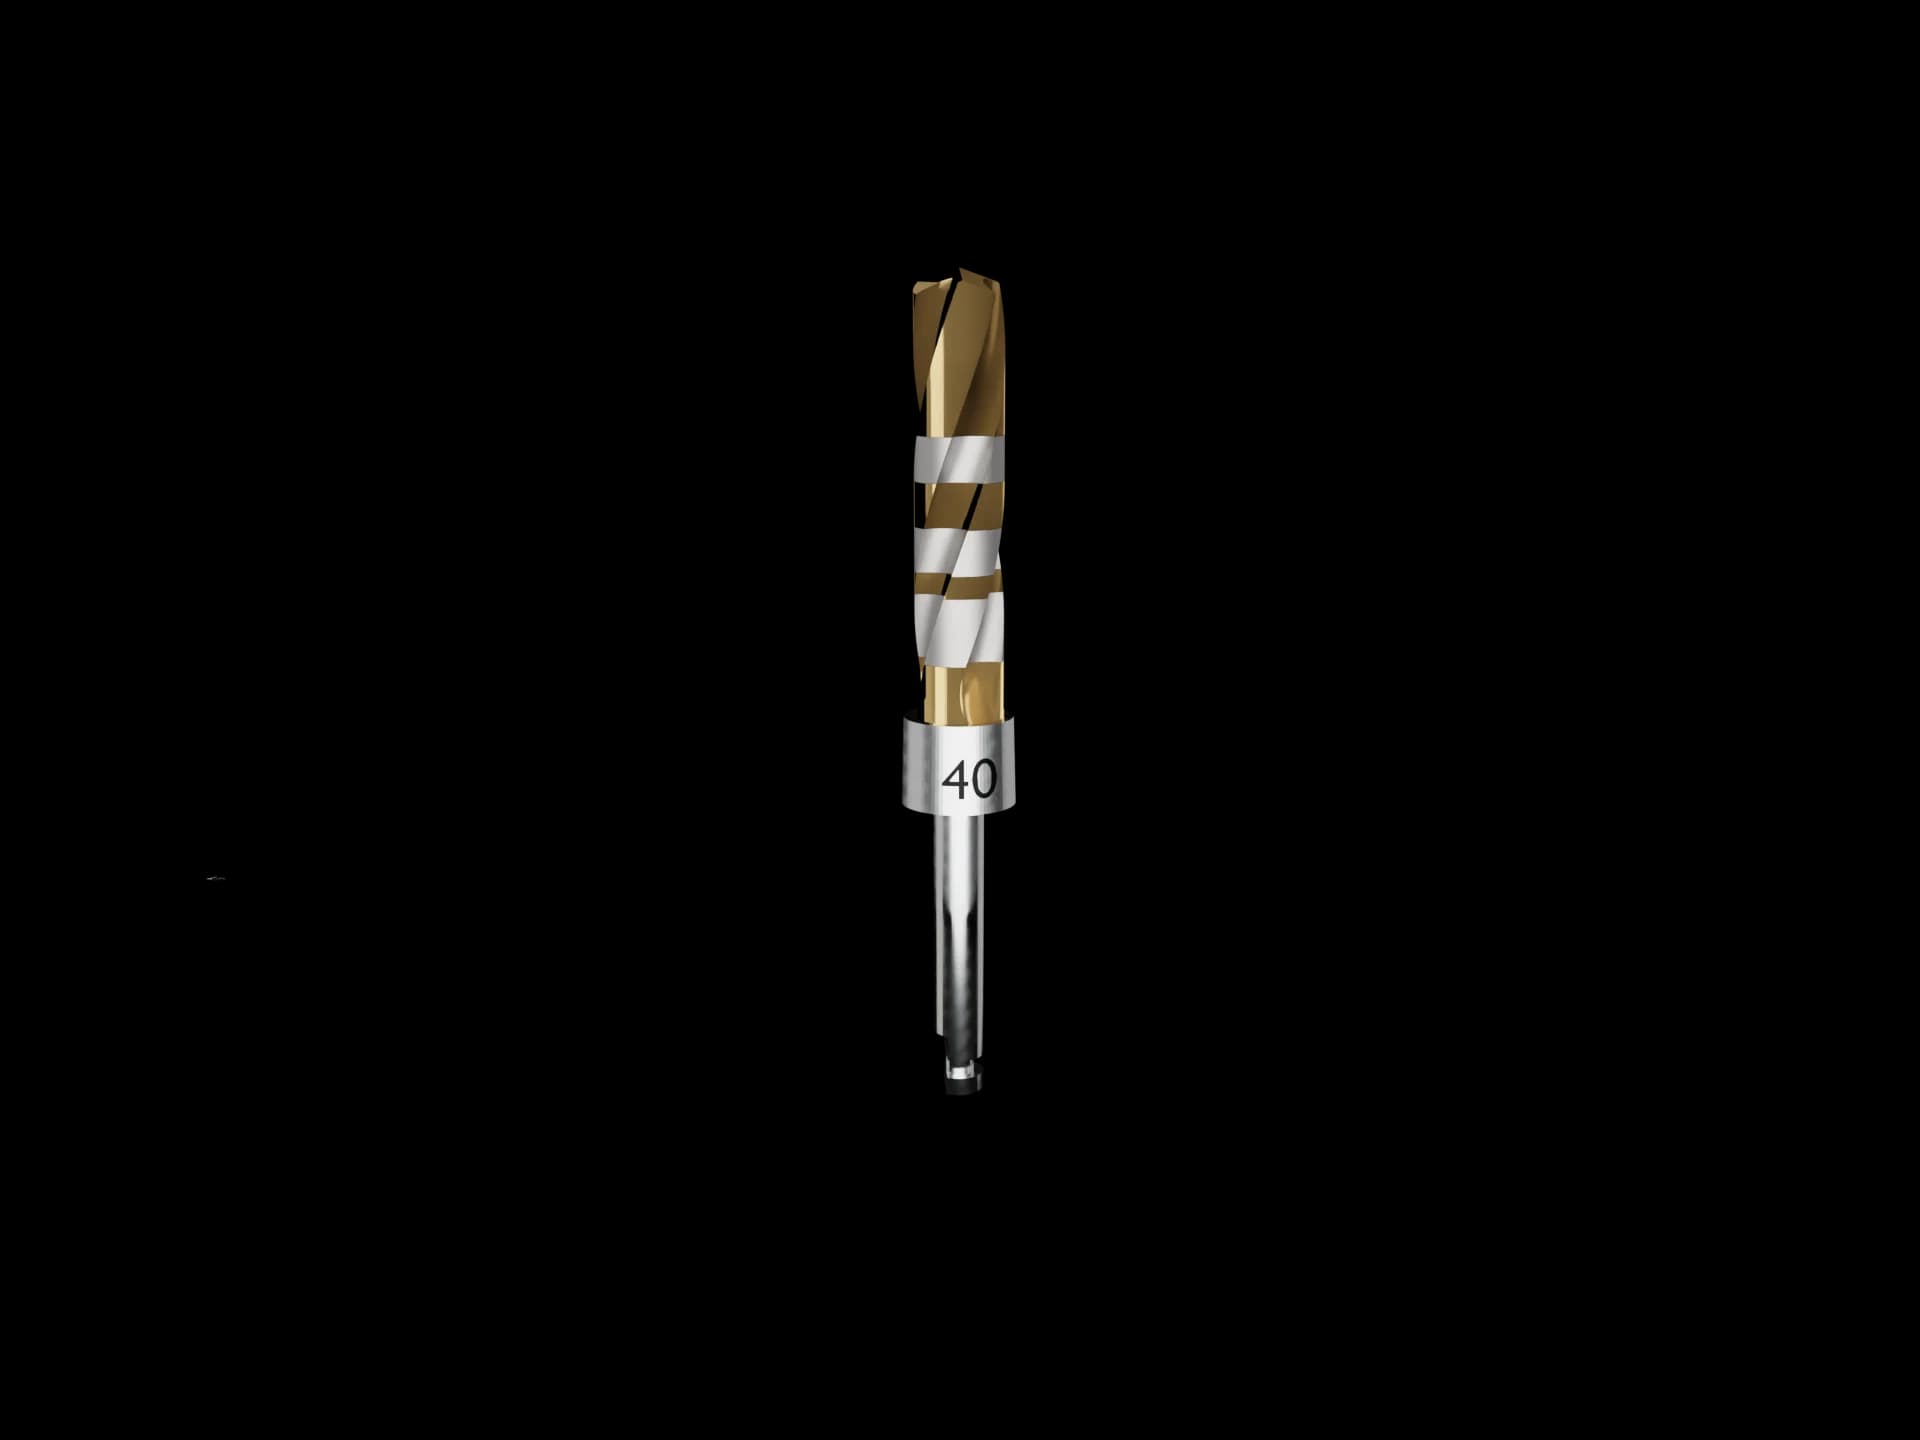
Drill #20
Trabecular drill (drill #2)
Used after the cortical pass to prepare the cancellous bone with controlled undersizing for primary stability.
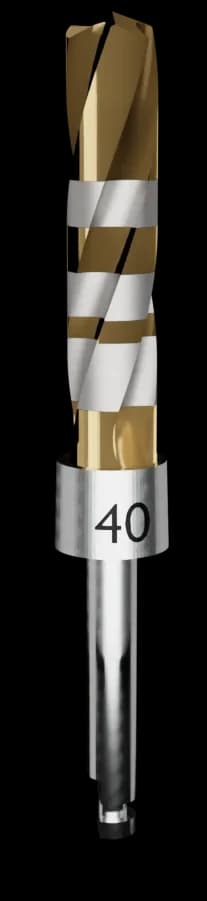
Drill #40
Cortical drill (drill #1)
Drill #1 for medium-diameter implants. Clears the crestal cortical plate before the trabecular drill engages.
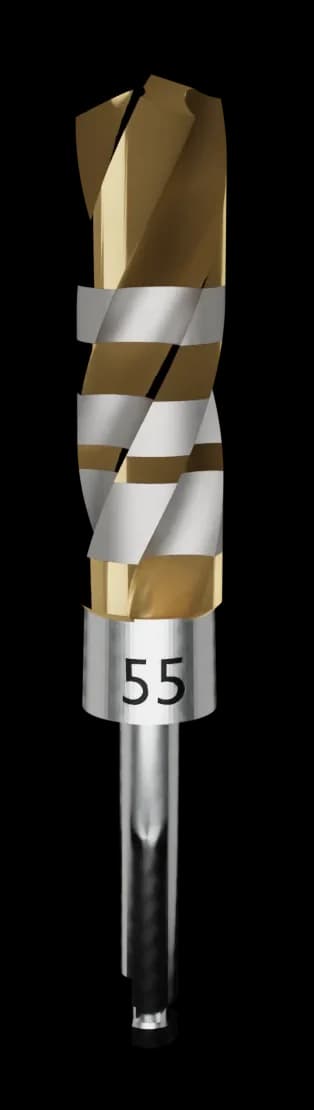
Drill #55
Cortical drill (drill #1)
Drill #1 for wide-diameter implants. Same cortical-first role as the #40, scaled to the larger implant body.
Clinical pitfalls
Most cortical drill failures aren’t about the drill itself. They’re about the protocol around it. Four patterns come up repeatedly in continuing-education case reviews of dense-bone and posterior-maxilla implant osteotomies.
Most implant systems ship a single one-size-fits-all countersink that’s wider than nearly every implant diameter. Used at the end of the sequence, that generic implant countersink over-relieves the cortical bone, removing the crestal contact that drives initial primary stability. A cortical drill matched per implant diameter sizes the cortical preparation to the actual fixture, not to the largest implant in the catalog.
A cortical drill is designed to clear the dense crestal layer, typically the first 1 to 3 mm of bone. Drilling past that with a cortical drill turns it into a wider-than-needed twist drill in the trabecular zone, wastes the dimensional control of the trabecular pass, and removes more bone than needed. The Crown Down crestal bone drill is calibrated so the tactile transition into trabecular bone is unmistakable; the clinician stops the moment the resistance drops.
In soft posterior maxilla bone, the crestal cortex is thin and the dense-bone scenario a cortical drill solves doesn’t really apply. In those sites, adding a cortical drill is an unnecessary step that can actually undermine primary stability by widening a cortex that wasn’t restrictive in the first place. The Crown Down 2-drill protocol allows the clinician to skip drill #1 in thin cortex and go straight to the trabecular drill, which is one reason the kit isn’t a rigid drilling sequence.
Two ways to manage crestal compression: cortical drilling (widening the crestal opening) and cortical tapping (cutting a thread into the cortex so the implant screws into pre-formed threads). Both improve primary stability in dense bone. A cortical drill is faster, requires no separate instrument change, and gives clearer tactile feedback, which is why the Crown Down protocol uses a matched dense bone drill instead of a cortical tap.
A flexible protocol, not a rigid drilling sequence.
The cortical drill is drill #1 of the Crown Down 2-drill protocol, but it isn’t mandatory at every site. The clinician decides when the crestal cortex calls for a dedicated drill and when to go straight to the trabecular pass.
Crown Down is built for dentists who want a smarter way to prepare implant osteotomies, not a slightly-different version of the same drill kit.
Clinicians placing freehand implants who want better tactile feedback and a faster, simpler osteotomy.
Practices running fully or partially guided cases who need a drill kit that pairs cleanly with stoppers and surgical guides.
Teams done with replacing dull steel drills, juggling reorder cycles, and tracking sterilization counts.
Dentists working across multiple implant systems who want a single drilling kit that doesn't lock them into one brand.
Practices ready to simplify osteotomy preparation from a long sequence to two tungsten carbide drills per site.
Dentists who want to collect a larger volume of clean autogenous bone chips during osteotomy preparation, without adding a separate harvesting procedure.
The System
The Crown Down system includes 15 mm and 20 mm surgical kits, individual tungsten carbide drills from Ø 2.75 mm to Ø 6.0 mm, and 3D stoppers for guided osteotomy preparation. See what’s inside the implant surgical kit.
CD-KIT-L015
2-drill tungsten carbide kit with 15 mm drills.
CD-KIT-L020
2-drill tungsten carbide kit with 20 mm drills.
#20 – #60
Solid tungsten carbide, Ø 2.75 to Ø 6.0 mm. Sold individually for misplaced or lost drills.
Guided surgery
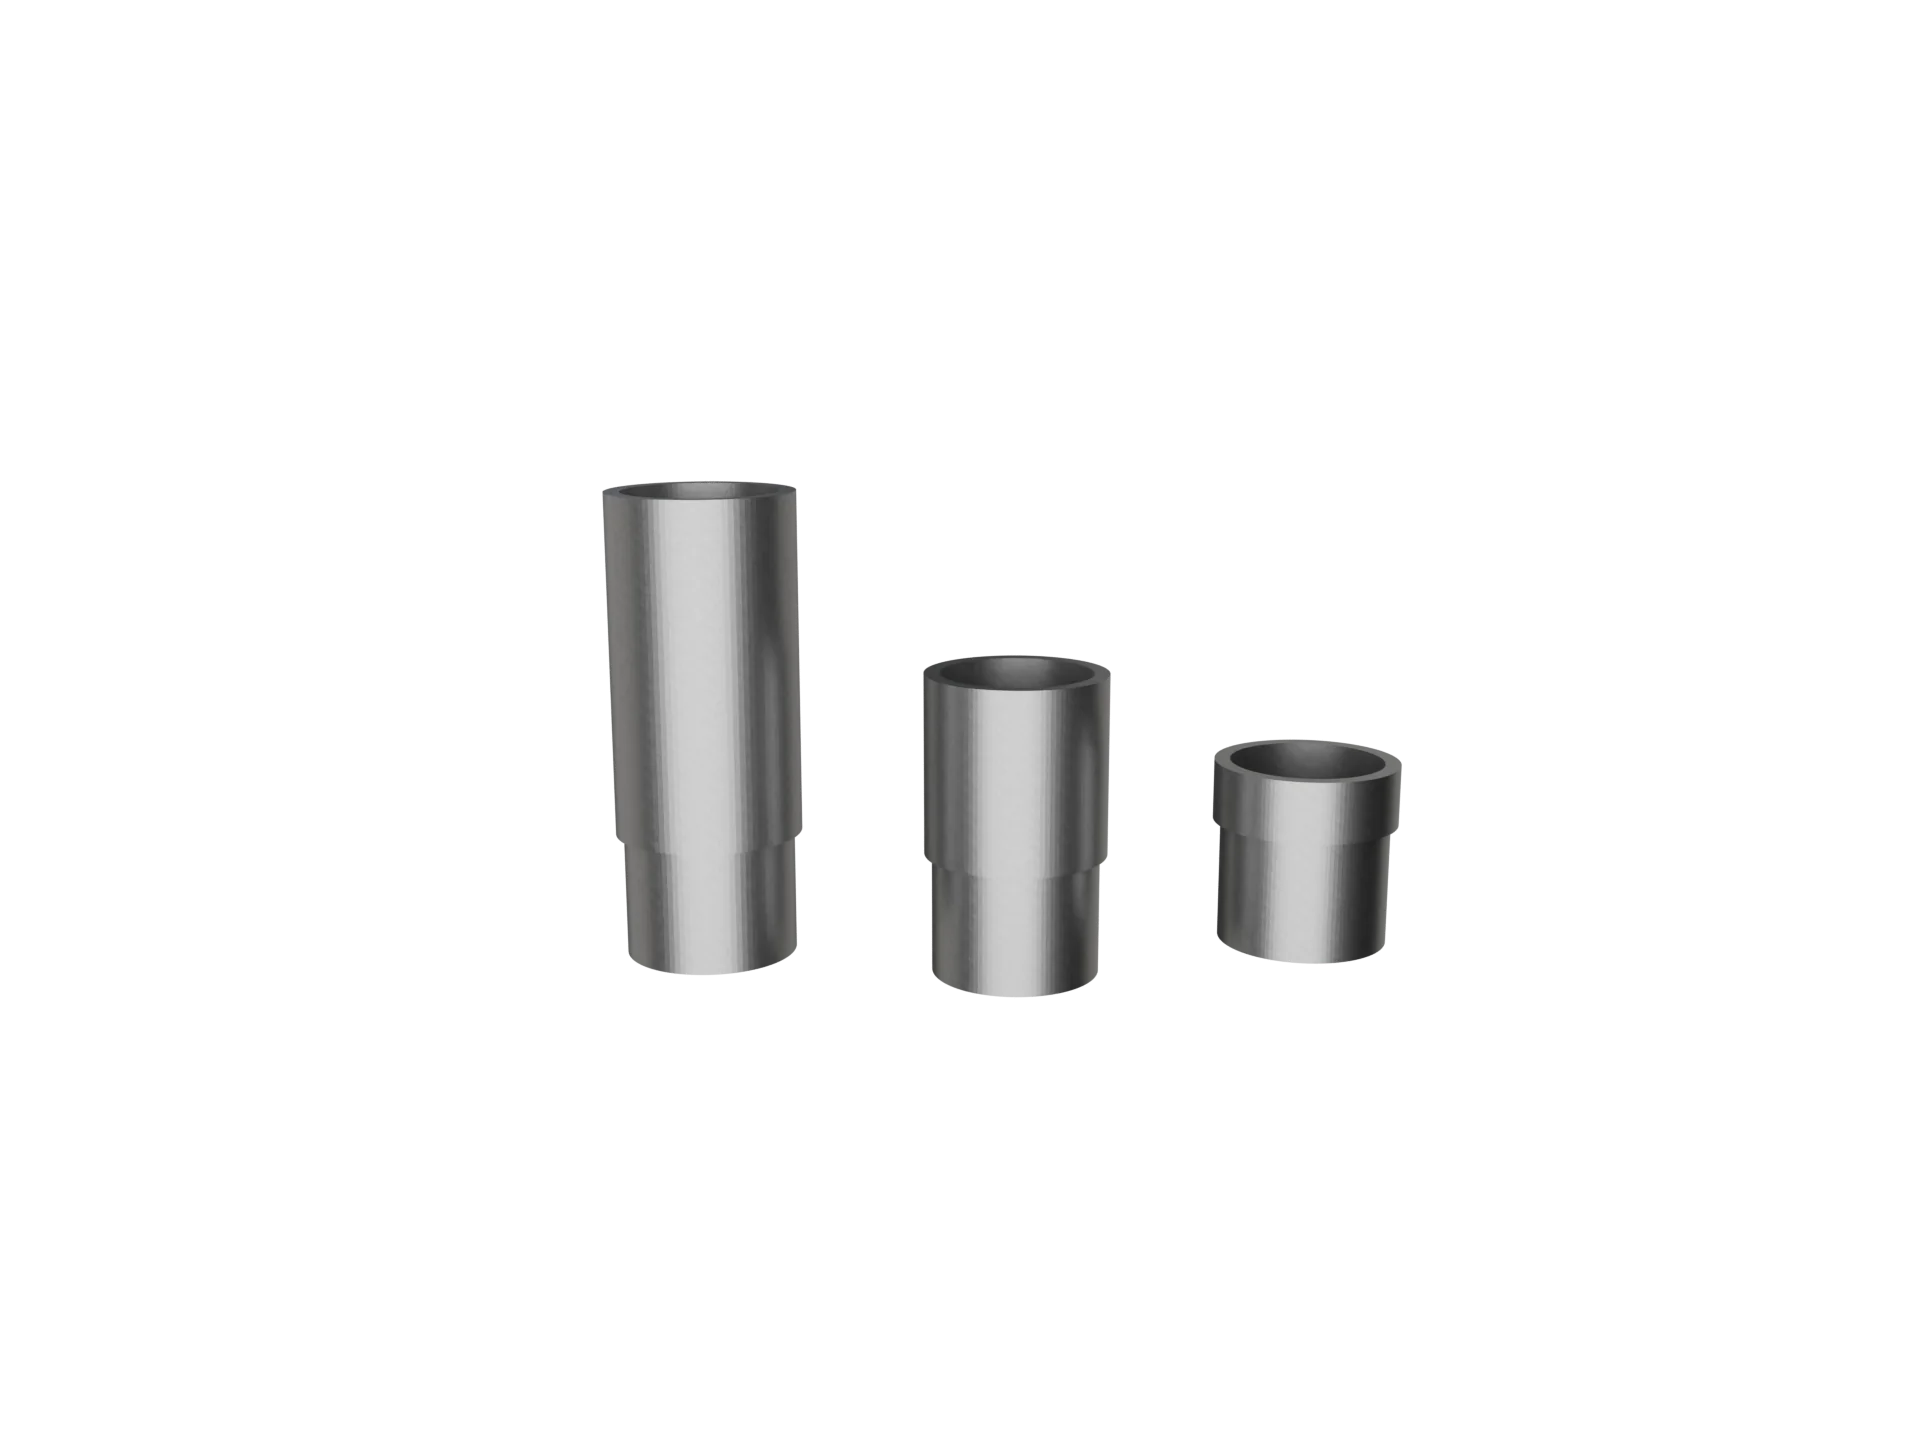
Three-dimensional drill control for guided osteotomy preparation.
Why design matters
The cortical drill operates in the densest, most thermally loaded zone of the osteotomy. That makes it one of the most mechanically vulnerable instruments in the sequence. It has to resist wear, hold its cutting edge, and pull heat away from the crestal plate. If the drill loses sharpness or traps heat, the risk of friction and thermal damage rises.
Hardness
~2,600 HV
Solid tungsten carbide is roughly 13× harder than the ~200 HV stainless steel used in conventional cortical drills. The cutting edge holds its geometry across unlimited clinical cycles.
Heat conductivity
110 W/m·K
About 6× the thermal conductivity of stainless steel. The drill pulls heat away from the cortex instead of trapping it in bone.
Matched diameter
1 per implant
One cortical drill per implant diameter, not a single general-purpose countersink. Cortical preparation is sized to the implant being placed.
Autoclavable
Unlimited
Standard autoclave cycles have no measurable effect on tungsten carbide drill performance. No replacement cycle, no recurring consumable cost.
For the full carbide-vs-steel breakdown, see carbide vs. steel implant drills.
Forget the long progressive drill sequences you knew from steel kits: 4 to 8 drills per site, dull edges over repeated uses, elevated heat during osteotomy preparation, and brand lock-in.
Problem
Steel’s lower thermal conductivity (around 18 W/m·K) can trap heat in the osteotomy during preparation. Learn about implant drilling heat.
Problem
Steel drills lose their cutting edge with repeated use, requiring regular replacement sets and ongoing supply cost for the practice.
Problem
Standard protocols require 4 to 8 sequential drill changes. Each swap adds chair time, complexity, and room for error.
Crown Down replaces your entire drill sequence with 2 solid tungsten carbide implant drills per site, designed for guided and freehand surgery, universal implant compatibility, and long-lasting performance backed by Crown Down’s wear-proof positioning.
6x
Up to 6x less heat in internal thermal testing under controlled conditions. Learn about implant drilling heat.
2
Two drills per site instead of four to eight. Fewer instrument changes, shorter procedures, and a simpler workflow.
0
Designed for unlimited clinical use under normal drilling conditions and backed by Crown Down’s wear-proof positioning, eliminating routine drill replacement caused by normal dulling.
Side-by-side comparison based on published material properties and clinical data.
| Feature | Stainless Steel Kits | |
|---|---|---|
| Drills per osteotomy | 2 | 5 to 8 |
| Heat generation | Up to 6x less in internal thermal testing | High |
| Cutting efficiency | Maintains edge under normal use | Slows quickly |
| Drill wear | Wear-proof positioning | Wears after few cases |
| Replacement cost | Eliminates routine replacement | Ongoing expense |
| Surgery modes | Guided and freehand | Varies by kit |
| Implant system compatibility | Universal | Brand-locked |
| Long-term cost | One-time purchase | Ongoing expense |
Stop spending $1,000 to $3,000 every year replacing dull steel drills.
See the full ROI for your practice; book a 15-minute call.
One-time investment • Wear-proof positioning • Universal compatibility
The 2-drill tungsten carbide protocol is backed by internal material testing, thermal measurement, and ongoing clinical use across implant systems.
1,000 osteotomy cycles each in bovine rib, pig rib, and bovine tibia at 22°C. No visible wear damage observed across all three internal tests.
Independent studies on implant drill material, heat, and repeated-use degradation: Koo 2015, Mendes 2014, Harris & Kohles 2001, Yalcin 2025.
Documented 5-year follow-up of a Neodent GM implant placed with the Crown Down protocol in a complex medically-compromised patient.
Disclosure: Internal testing was performed on benchtop bone substrates under controlled drilling conditions and is intended for comparative reference. Clinical outcomes depend on operator technique, drilling parameters, and case-specific anatomy. Clinicians should follow their training and clinical judgment when selecting drilling protocols.
Clinician Reviews
Implant clinicians on durability, cost, and heat control with the Crown Down system. Read the full set of 6 reviews on each product page.
“I switched to Crown Down two years ago and haven't replaced a single drill. My implant site prep is noticeably faster and I have much better tactile feedback through the bone.”
Dr. Henri Diederich
Luxembourg
“I was skeptical at first, but after 18 months of daily use the drills still cut like new. The heat reduction is real, and my patients report less post-op discomfort.”

Dr. Ernesto Antonio Pichardo Tejada
Dominican Republic
“What sold me was the economics. I used to budget for replacing dull drills every quarter, and that line item is simply gone now. The carbide holds its edge case after case, and the consistency that gives me during osteotomy prep is worth as much as the savings.”

Dr. Philippe Bertrand
Montreal, Canada
Founded by Dr. Zvi Fudim, Crown Down develops surgical drilling systems that address the core challenges dentists face with implant integration. Our technology draws on decades of clinical practice and materials science to deliver instruments that are more durable, thermally efficient, and cost-effective than conventional stainless steel alternatives.

Founder & CEO
Practicing implant dentist with decades of clinical and materials science experience.

COO
Leads operations, manufacturing, and product delivery.

CTO
Leads engineering, product development, and the Crown Down technology platform.
Crown Down is a universal implant drilling kit compatible with Nobel Biocare, Straumann, Zimmer Biomet, MIS, BioHorizons, Osstem, and other major implant systems.
See the difference for yourself
Join the clinicians who’ve eliminated routine drill replacement and simplified their osteotomy workflow.
The questions clinicians ask most before adopting the Crown Down cortical-first protocol.
Still have questions?
Get answers and your practice-specific ROI on a free 15-minute call.
Want to see how much you'd save, watch a clinical demo, or talk through compatibility with your implant systems? Book a call or send us a message and we respond within one business day.
Free 15-minute consultation • No commitment
We typically respond within one business day.
Crown Down Drilling Kit
2 drill protocol • Wear-proof positioning